Saturday, April 30, 2016

Dome Assembly Part 1

Putting the pieces together (PLA Welding)


After my trip to NYC to see daughter... got back into actually assembling all the pieces for the main dome structure.

Items needed for assembly:
3 1/3 pieces of the dome printed 3D
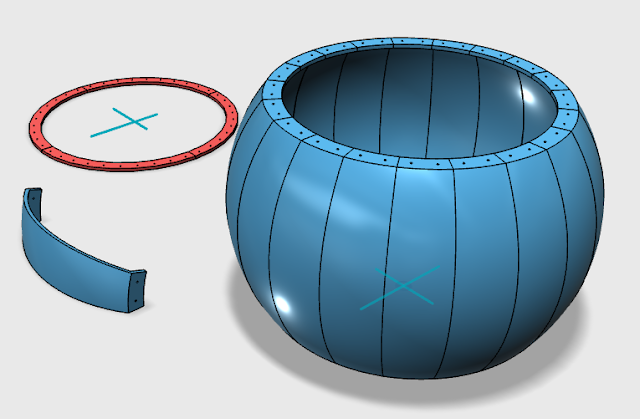
3 1/3 pieces of the under carriage or skirt printed 3D
3 1/3 pieces of the lower band between the skirt and the upper dome pieces.
#16 weld-on in tube with glue tip


The PLA Welding will require

A rotary tool (Don't bother trying to use cordless - battery goes dead in 5mins) such as a dremel or cheap rotary drill from harbor freight.
1/8" chuck mount to apply the filament to (used for PLA welding).
Extra white filament to use for welding.


Dremel with adjustable chuck.


You will cut 1-2" strips of filament (1.75mm) and straighten it to insert into the chuck of the drill.  This will rotate at high speed to basically melt and weld the plastic pieces together.  This also forms a bond that is stronger than glue and helps create a lip large enough to file down and sand.


Need solder cutter/pliers which are awesome for this purpose of trimming.


Dry fitting the pieces

First we dry fitted the pieces together to see where the prints didn't align correctly and where I would have to adjust pieces with a hobby knife.

The lower band (this piece will be made to look like silver/metal) has the pilot holes to align and connect the dome upper pieces together.  I used this to help guide the 3 pieces together above as well as overlap each piece to create a strong bond during gluing.

Applied some #16 to the bottom and placed each dome piece onto the lower bands... once completed I used screws #4-40 3/8" screws to keep them aligned while it dried.

I then went to work welding the dome slices together
You can see welding plastic examples watching these YouTube videos:


Once completed with the first try of all the seams... I then took a metal file and began filing down the seams till they were flat as the rest of the sides...  For the first try it is already looking great.  Will need to apply some more plastic to some areas where there are cracks etc... but welding definitely works!


The dome shell is assembled... needs some more welding and gap filing.


Some of the texture lines will need to be filed out but that seam which is in the middle is only noticeable due to the darker it appears in the photo.


This seam here is needing to be filed... you can see where the plastic is raised before I file it down.


Sunday, April 10, 2016

Hardware Breakdown for the Cheese and Hub sections - The Banana

The Banana

Hardware needed to assemble the drive carriage, also known as "the Banana".


I am trying to help others here by posting what I have sourced so far for parts to complete and assemble the Hub and Motor sections.

NOTE: This is following James Bruton's XROBOTs.co.uk BB8 version 3 build...

The altercation below is with the small wheels... the larger drive wheels I will not be able to get away with, but the smaller wheels I found baggage replacement wheels are the same size and configuration as what James' printed using his Lulzbots nanjaflex extruder setup... my printers do not print flexible material very well - if at all... so I will have to source out a online printer to help print the main drive and banana drive wheel surfaces...

Parts:
Qty
Part Type and Name
Cost
Where
6
8.00
Small outer wheels on banana
21
7.48
Small outer wheels on banana
2
M6 120mm bolts
7.39
Small inner wheels on banana
27
4-40 7/8" Screws
8.53
Small Wheel Screws for assembly
12
4-40 1/2" screws
7.91
Banana frame assembly support
9
6x19x6 Bearings
6.56
Small Wheel for assembly
2
30x62x16 Sealed bearings
10.43
Banana axle assembly
24
4-40 Blind Nuts
5.51
Banana frame assembly to wheel assemblies
27
4-40 hex nuts
11.95
Small Wheel Assembly
20
4-40 1" screws
7.29
Banana frame assembly to parts
3
4-40 Nut common
8.96
Small Wheel Inner connection spacer
2
Front Windshield Wiper Motors
25.00
Drive Motor assembly
20
Luggage Wheels (50mm x 18mm x M6)
50.00
Small Wheels (instead of printing)

Another great shot of the banana outside the cheese...


Sunday, April 3, 2016

The Main Drive and Outer Hub

The Main Drive and outer hub is where we will start with the assembly.  Following James Bruton's Awesome video series and informational blog... we will start work on the hub and main drive systems.

The hub

Known as the "cheese" from Mr. Bruton consists of 20 barrel like slices connected to outer rings that keep its shape.  It is 300mm wide which is 100mm wider than his version 2.


Each slice on his printer took roughly 4hrs with ABS.  I am printing each one in PLA at 40% infill and .26 layer height with 3 parameters which takes 10-11hours each.
Total time to print these is 240hours from start to finish. 

Thank God I have 2 printers...

NOTE: Most of everything that we will be printing will be using the following settings:

Layer Height: .26
infill: 40%
Parameters: 3
TopFill: 3
BottomFill: 2
Speed: 60mm/s

Nozzle: .4
Filament: 1.75


The Cheese consists of the 20 slices and 2 outer rings all connected via screws #4-40 1/2" and Weld-On 16 solvent...


Once the cheese is assembled you will need to file and fill many uneven spots on this hub because the more smooth and circumference is.. the better the rolling and hub movement with the motor.


After printing each one... used Weld-On 16 to assemble the pieces


Assembly is basically connect a inner ring to cheese piece with screws (4-40 1/2") and glue... you can never over glue these pieces... we are looking for it to be ridged and strong.

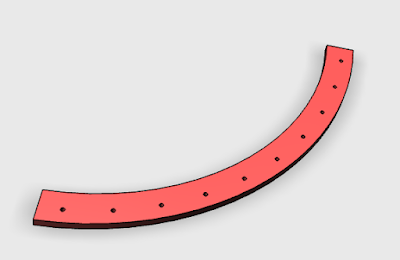
1 inner ring piece looks like this:


So we need to offset the slices so a slice is connected to 2 of these and bridges the connection between ring pieces (4 parts).


You offset each slice (here is a markup of where you will connect the slices.
On the very first piece, I suggest starting from the most inner piece and working you way 1 or both directions.


Here is some photos of my first 2 rings connected via the slices... making my way around.


Notice the last slice(s) here are connecting or bridging the next inner ring piece as an alignment...


Great view of 2 inner prints connected and bridged as well as completed before starting on the 2nd half of the cheese.


And the 3rd inner ring is connected and progress continues...  The great thing about Weld-On 16 is it dries in like 1 minute.  In 10 minutes its as hard as a rock!  But because of its gel-like properties its great for positioning pieces before it hardens.


Another view of 3rd section being connected and bridged by a slice... and adding continues.


Almost there...


Another piece and notice I have to use a slice to bridge the last ring into place.  This also indicates if you connected them right and adjustments will be made here to align the ring.


This is a great example of what type of sanding, filing and filling will have to be done to get this smooth... see how this slice is offset from the 2 adjacent to it.

The final piece assembled and dried... looks great!