The hub
Known as the "cheese" from Mr. Bruton consists of 20 barrel like slices connected to outer rings that keep its shape. It is 300mm wide which is 100mm wider than his version 2.
Each slice on his printer took roughly 4hrs with ABS. I am printing each one in PLA at 40% infill and .26 layer height with 3 parameters which takes 10-11hours each.
Total time to print these is 240hours from start to finish.
Thank God I have 2 printers...
NOTE: Most of everything that we will be printing will be using the following settings:
Layer Height: .26
infill: 40%
Parameters: 3
TopFill: 3
BottomFill: 2
Speed: 60mm/s
Nozzle: .4
Filament: 1.75
The Cheese consists of the 20 slices and 2 outer rings all connected via screws #4-40 1/2" and Weld-On 16 solvent...

Once the cheese is assembled you will need to file and fill many uneven spots on this hub because the more smooth and circumference is.. the better the rolling and hub movement with the motor.
After printing each one... used Weld-On 16 to assemble the pieces


Assembly is basically connect a inner ring to cheese piece with screws (4-40 1/2") and glue... you can never over glue these pieces... we are looking for it to be ridged and strong.
1 inner ring piece looks like this:


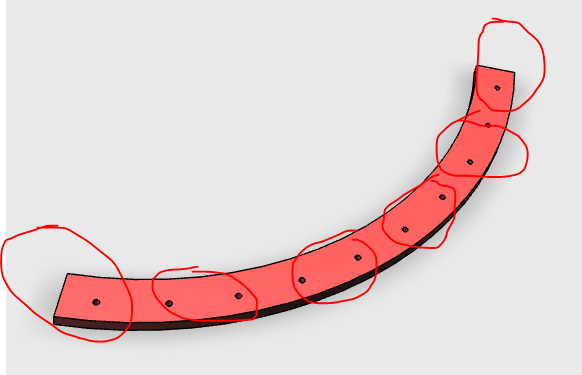
You offset each slice (here is a markup of where you will connect the slices.
On the very first piece, I suggest starting from the most inner piece and working you way 1 or both directions.
Here is some photos of my first 2 rings connected via the slices... making my way around.

Notice the last slice(s) here are connecting or bridging the next inner ring piece as an alignment...

Great view of 2 inner prints connected and bridged as well as completed before starting on the 2nd half of the cheese.

And the 3rd inner ring is connected and progress continues... The great thing about Weld-On 16 is it dries in like 1 minute. In 10 minutes its as hard as a rock! But because of its gel-like properties its great for positioning pieces before it hardens.

Another view of 3rd section being connected and bridged by a slice... and adding continues.

Almost there...

Another piece and notice I have to use a slice to bridge the last ring into place. This also indicates if you connected them right and adjustments will be made here to align the ring.

This is a great example of what type of sanding, filing and filling will have to be done to get this smooth... see how this slice is offset from the 2 adjacent to it.
The final piece assembled and dried... looks great!


No comments:
Post a Comment